I originally bought the latest car for spares, but after driving it, albeit with no clutch, and checking its generall condition, I decided to repair it.
The Haynes manual give you a rough outline for the job but misses out a lot and is not arranged in the best order. For instance it says:
'Jack up the car and support it on axle stands' If you do that first, you have to stand on tiptoe to dismantle the under bonnet components. By all means place a jack under the car before you start dismantling or you won't be able to once the car is imobilised.
First thing to remove is the air filter and hoses, a fairly simple job, the top end is held down by a strange rubber fixing, smearing it with waxoil will help.
Next, the hydraulic reservoir, quite simple, only one bolt and a clip. The more difficult part is fighting the lid + hoses out of the tank - but it can be done.
Thirdly and not quite so easy is removing the battery tray. Two of the bolts are fairly evident but the third is underneath behind the pipe from the intercooler, which you will have to remove. The fuel filter and several relays are also attached to the tray and will need to be removed. The bonnet catch cable also passes through a hole in the tray, I made a slit in it with a pair of tin snips to slide the cable out. Much easier than dismantling the catch!
You should have a nice big hole now, the next thing is to unbolt the pressure regulator and distribution valve assembly from the gearbox. This job will be made much easier if you remove the accumulator sphere first, you probably need a new one anyway, you can actually see the bolts you are undoing. You can bend the pipes removing the gearbox, so it might be advisable to remove one or two. I didn't, and had a struggle to line it all up again.
Now is the time to jack it up and put it on axle stands. Remove the speedo drive, or disconnect the plug on a Mk2, just above the entry point of the o/s drive shaft into the diff. Disconnect the gear linkage, you need to prise the ball joints off, a pair of long nosed pliers can be used to lever against the rod. Take the long ones off the gearbox end, the shorter one is best disconnected from the linkage an left on the gearbox. While you are under there, remove any gearbox to engine bolts you can see and also the flyheel cover.
You now need to remove the drive shafts. Remove wheels, seperate bottom balljoints. The hub can be swung away and the n/s shaft should pull out, the o/s one will need the centre bearing undone and driven out. Put something underneath to catch the gearbox oil first!
The gearbox mounting stud will need removing, this is locktighted in and very tight, I had to use three lock nuts and a lot of force on mine. Also the mounting bracket on the car will have to be taken off to give sufficient room.
I expect at this stage you will need a lie down, but before you go just check that everything is disconnected from the gearbox including the battery earth lead and reverse light plug.
Now, you should be able to see most of the gearbox bolts, support the engine and gearbox with jacks and remove the bolts including the starter bolts. You should then with some difficulty be able to seperate the gearbox from the engine. You will probably find you will have to make several adjustments the the hieght of the engine/gearbox in order to withdraw it sufficiently. Removal of the clutch and thrust bearing should be self explanatory.
Reassembly is a reversal of the above, as they say. If you don't have a clutch centering tool, you should be able to get it right by rotating the flywheel with the bolts finger tight, and moving the clutch plate until it is the same distance from the edge of the cover plate all the way round.
I had considerable difficulty re engageing the gearbox shaft with the clutch plate, I eventually found some old cylinder head studs with the same thread, pushed them through the holes at the top of the gearbox and screwed them into the engine and used them to guide the gearbox in, worked a treat!
I have some photo's of the above work but don't know how to upload them.
A very tired...
Peter.N.
Full Version 2.1 Clutch Swap
Hi Peter
That's a useful guide you have put together which I will print out to supplement my Haynes book of fairy stories. I have done this job some years ago and like you when it was finished I recall feeling 'cream crackered' so to speak.
Regards
Ken
That's a useful guide you have put together which I will print out to supplement my Haynes book of fairy stories. I have done this job some years ago and like you when it was finished I recall feeling 'cream crackered' so to speak.
Regards
Ken
A couple of PSs to that.
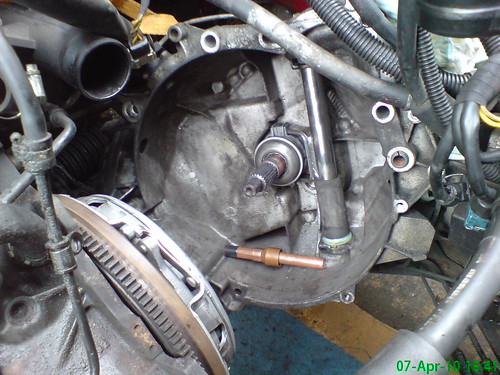
The manual tells you to remove the TDC sensor, I couldn't at first see why as you can unplug it, but, as it projects beyond case of the gearbox there is quit a risk of damaging it when you refit the box. It is not easy to remove in fact I couldn't get it out until I had withdrawn the box an inch or two - but its easier to put back.
Secondly, after removing the air filter you are left with a large pipe dissapearing through the inner wing, block it up with something, or anthing you drop will dissapear down it! I didn't, in consequence there are now a spanner and socket + extension lurking in the pipe underneath which I am still trying to get out.
Peter.N.
Hi Peter,
I don't want to hijack your thread but in this photo you can see my home made clutch tool -
Steve.
I don't want to hijack your thread but in this photo you can see my home made clutch tool -
Steve.
Hi Steve
My word, that was a long time ago, I had forgotton I had posted it! True there is nothing like the right tool for the job but at the time I didn't have the right tool.
How did you get your gearbox that far away from the engine, I could only just get my hands into mine?
Peter
My word, that was a long time ago, I had forgotton I had posted it! True there is nothing like the right tool for the job but at the time I didn't have the right tool.
How did you get your gearbox that far away from the engine, I could only just get my hands into mine?
Peter
This is a "lo-fi" version of our main content. To view the full version with more information, formatting and images, please click here .