| Welcome Guest ( Log In | Register ) | Resend Validation Email |

  |
| steelcityuk |
Posted: January 12, 2011 09:06 pm
|
|
Double Chevron  Group: Members Posts: 689 Member No.: 388 Joined: June 21, 2006 |
Hi All,
I decided some time ago that something must be done about the state of the single spoke steering wheel in the SED. The leather finish was coming off in various places and the stitching had burst here and there so the initial thought was to buy a better one. However the only one I saw went for more than I could justify so that meant the other options was to swap it back to a 2 spoke wheel or refurbish the one already fitted. One of the things I really liked about the series 1 was that wonderful layout of the dash, switch gear and the single spoke wheel that gives such a great view of it all, so refurbish was the way to go. Checking the web brought up conflicting advice as to what should and shouldn't be done to leather interiors. The advice that made the most sense to me was that water based 'flexible' dyes work best. So after further searching I settled on a kit from the Furniture Clinic which includes - leather prep, leather cleaner, water based dye, gloss sealer, satin sealer, abrasive pad, cotton wool balls, cloth, foam block, airbrush and propellant. During the search for the leather repair kit I ordered some waxed linen thread to restitch the leather cover to the wheel. This was bought from an ebay seller and arrived very quickly. Restitching the leather took about 2 hours using the same stitch pattern as was originally used. The thread was 5 metres long so I started in the middle and stitched both ways. Following the instructions in the kit I put some leather prep on a cotton wool ball and covered it with the abrasive pad (scotchbrite pad), after a good scrubbing, changing the cotton wool ball and using a clean bit of pad, all the leather finish was removed, a good wipe over with more leather prep removed any remaining residue. Next a thorough wipe with the leather cleaner removed the last of the greases/oils that could be contaminating the leather was needed. After this a gentle sanding with 1500 grit silicon carbide paper smoothed out the worn patches and provided a good key for the dye. Another wipe over with the leather prep and leather cleaner was needed followed with about an hours drying time to ensure the leather cleaners had evaporated completely. Heres how it looks after those first steps - 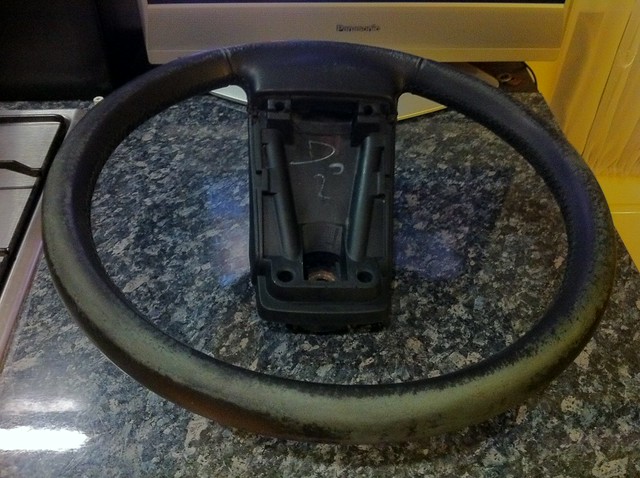 After several sponge applied coats and a couple of sprayed coats this is how it looks - 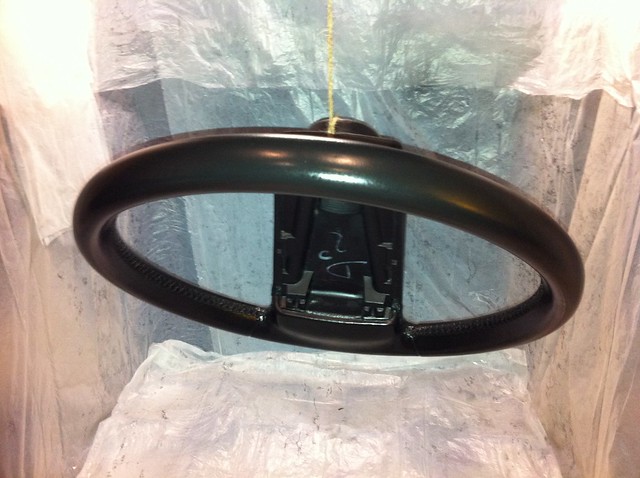 TBC Steve. This post has been edited by steelcityuk on January 12, 2011 09:07 pm -------------------- XM 2.1 SED - RP5876
Prius T Spirit - MB A170 CDi XM S2 2.0 TCT LPG Exclusive Hatch RP6654 C5 HDi110 Exclusive XM S2 2.5 VSX Estate XM S2 2.1 VSX Hatch Xantia HDi Exclusive 405 GTX TD |
 

|


| White Exec |
Posted: January 12, 2011 09:23 pm
|
 Member Group: Members Posts: 20 Member No.: 1637 Joined: December 08, 2010 |
A really fantastic job, Steve! Thanks too for all the product and technique detail. Quite agree with you about the appeal of the single-spoke wheel, which we really liked on our old BX, and is hallmark Citroen. We have a RAV4 whose wheel and gear-lever could benefit from same treatment.
Chris -------------------- '89 BX19RD hatch, Richelieu Red (now history)
'96 XM S2 2.5TD Exclusive hatch, RP 7165 Polar White First reg in UK (S-reg, 1 Dec '98), now on Spanish plates in Sayalonga, Malaga |
|
|
| steelcityuk |
Posted: January 14, 2011 12:01 pm
|
|
Double Chevron Group: Members Posts: 689 Member No.: 388 Joined: June 21, 2006 |
Next on the list is the drivers seat back which has some wear on the panel. It's not worn through but has lost all it's finish on a palm sized area.
Steve. -------------------- XM 2.1 SED - RP5876
Prius T Spirit - MB A170 CDi XM S2 2.0 TCT LPG Exclusive Hatch RP6654 C5 HDi110 Exclusive XM S2 2.5 VSX Estate XM S2 2.1 VSX Hatch Xantia HDi Exclusive 405 GTX TD |
|
|
| Jan-hendrik |
Posted: January 15, 2011 12:16 pm
|
 Double Chevron Group: Members Posts: 569 Member No.: 716 Joined: March 28, 2007 |
Amazing!
 -------------------- 2000 XM 3.0 V6 24v Exclusive Auto 70k km (LHD; ORGA 8569)
Green (the colour that is) Location: Hiroshima City, Japan |
|
|
| steelcityuk |
Posted: January 16, 2011 11:41 pm
|
|
Double Chevron Group: Members Posts: 689 Member No.: 388 Joined: June 21, 2006 |
Thanks chaps.
So on Saturday I had time to remove the drivers seat to see how that looked. Considering that the car was built in December 1992 the seat is in good condition. 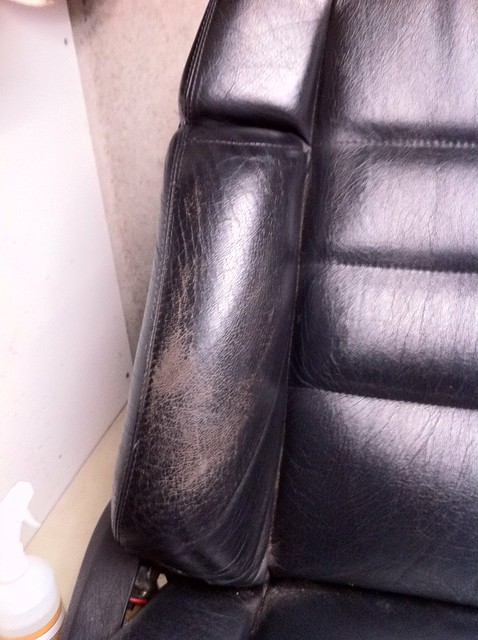 After cleaning, stripping, a light sanding with 1500 grade silicon carbide, the patch was dyed with a foam block and then blended with several coat from the airbrush. 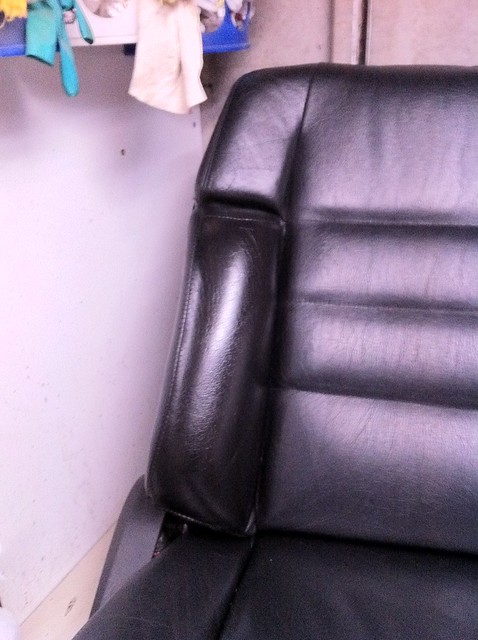 However I think the bolster is now a darker black than the rest of the seat so that's next. Steve. -------------------- XM 2.1 SED - RP5876
Prius T Spirit - MB A170 CDi XM S2 2.0 TCT LPG Exclusive Hatch RP6654 C5 HDi110 Exclusive XM S2 2.5 VSX Estate XM S2 2.1 VSX Hatch Xantia HDi Exclusive 405 GTX TD |
|
|
| steelcityuk |
Posted: April 14, 2011 08:26 am
|
|
Double Chevron Group: Members Posts: 689 Member No.: 388 Joined: June 21, 2006 |
After many diversions I finally got around to finishing the seat off.
The leather was stripped back to remove all waxes and provide a key, several coats of dye applied followed by a several coats of satin finish then finally 3 coats of gloss finish. Here's how it looks before 'polishing' with leather care. 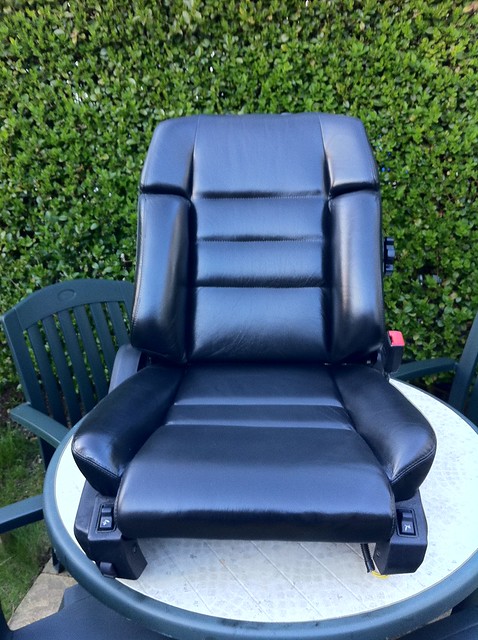 I think this wraps up the leather refurb. Steve. -------------------- XM 2.1 SED - RP5876
Prius T Spirit - MB A170 CDi XM S2 2.0 TCT LPG Exclusive Hatch RP6654 C5 HDi110 Exclusive XM S2 2.5 VSX Estate XM S2 2.1 VSX Hatch Xantia HDi Exclusive 405 GTX TD |
|
|
| lez |
Posted: August 05, 2011 10:49 am
|
 Super Member Group: Members Posts: 224 Member No.: 397 Joined: July 09, 2006 |
you make it sound too easy steve, how many hours do you think the seat actually took....
-------------------- |
|
|

| Dieselman |
Posted: August 16, 2011 09:21 pm
|
|
Advanced Member Group: Members Posts: 192 Member No.: 1472 Joined: February 01, 2009 |
That looks good but why did you opt for a gloss finish instead of matte or satin?
|
|
|
| steelcityuk |
Posted: September 17, 2011 10:24 am
|
|
Double Chevron Group: Members Posts: 689 Member No.: 388 Joined: June 21, 2006 |
Sorry chaps I didn't respond before, I've been a bit caught up at work and home.
The seat didn't take too long to do in actual time working on it but with other things to attend to it took weeks. You could have one done in a few hours if it wasn't for drying time between coats, this can be speeded up using a hair dryer. I did try a mat finish on the steering wheel but it just looked wrong to me, somehow it looked half finished not like factory mat finish. In gloss it's proved east to grip but not 'sticky' so it doesn't slide when needed. Steve. -------------------- XM 2.1 SED - RP5876
Prius T Spirit - MB A170 CDi XM S2 2.0 TCT LPG Exclusive Hatch RP6654 C5 HDi110 Exclusive XM S2 2.5 VSX Estate XM S2 2.1 VSX Hatch Xantia HDi Exclusive 405 GTX TD |
|
|
| nightmare |
Posted: February 12, 2012 01:15 am
|
|
Advanced Member Group: Members Posts: 100 Member No.: 1849 Joined: January 24, 2012 |
You do know that you've got a job for life now.
 mine next.  Please Pretty please With cherries on top This post has been edited by nightmare on February 12, 2012 01:17 am -------------------- XM 2.5TD Exclusive "N" Reg Emerald green RP 6679 (Resting)
Xantia 1.9td SX "L" Reg Emerald green RP 6099 (R.I.P.) Buckie Scotland |
|
|
| steelcityuk |
Posted: February 24, 2012 09:14 pm
|
|
Double Chevron Group: Members Posts: 689 Member No.: 388 Joined: June 21, 2006 |
Nice try but the wife wouldn't be happy if I turned her hob into a spray booth again.
Steve. -------------------- XM 2.1 SED - RP5876
Prius T Spirit - MB A170 CDi XM S2 2.0 TCT LPG Exclusive Hatch RP6654 C5 HDi110 Exclusive XM S2 2.5 VSX Estate XM S2 2.1 VSX Hatch Xantia HDi Exclusive 405 GTX TD |
|
|
| robertxmb |
Posted: February 25, 2012 09:30 pm
|
|
Super Member Group: Members Posts: 255 Member No.: 184 Joined: June 14, 2005 |
Hi Steve,
Re the seat, which looks lovely; the acid test is whether you would risk your mother- in- law sitting in it in her best dress for a few hours on the way to a wedding. Robert. |
|
|
| djm666 |
Posted: March 29, 2012 11:02 am
|
 Member Group: Members Posts: 29 Member No.: 1658 Joined: February 07, 2011 |
My mother in law moaned all the way to the seaside the other day and was still moaning when we got back even after i took her off the roof rack.
bloody nice job on the seat and the wheel, i will have to look into that for mine. -------------------- XM 2.0 Sei 1991 Dark Green
H426AAM previous UK reg now NZ reg TU9287 |
|
|
0 User(s) are reading this topic (0 Guests and 0 Anonymous Users)
0 Members:
 |
|
Skin arobase par alphega @ PCentraide 2005 (original)
V1.3 par Elianora la blanche @ La Caverne de la Rose pourpre
V1.3 par Elianora la blanche @ La Caverne de la Rose pourpre
Powered by Invision Power Board(U) v1.3.1 Final © 2003 IPS, Inc.