

 Repair To A Washer Reservoir
| Welcome Guest ( Log In | Register ) | Resend Validation Email |
| 2 Pages:12 ( Go to first unread post ) |    |
Repair To A Washer Reservoir| DerekW |
Posted: November 20, 2007 06:16 pm
|
|
Andre's Mate  Group: Members Posts: 1320 Member No.: 173 Joined: June 01, 2005  |
As reported elsewhere, the windscreen washer reservoir on the V6 developed a leak. Having removed it from its nesting place inside the nearside wing, I found a half inch crack starting from the hole for the level sensor. For those who haven't seen one, these tanks are made from polypropylene which, as you probably know, is virtually unstickable.
Fortunately for me my guardian angel offered to supply me with a replacement so with nothing to lose I thought I'd try to "weld" the split. The softening temperature seems to be about the same as the melting point of soft solder and it was relatively easy to mould the material around the crack using a small point soldering iron, with filler rod cut from a half litre milk container. I didn't clean the tinning off the iron before I started so the repair has a rather attractive speckled silvery appearance! There is now no obvious leak but of course I don't know how long the repair will last and a replacement is obviously preferred. If you don't have a guardian angel it may be worth trying a repair. Derek -------------------- 1999 3.0V624v Exclusive Black! (RP8362)
2004 C3 Sensodrive Exclusive 1994 ZX Aura 1.8 auto Location: 5 miles North of Boston, Lincolnshire |
 

|


| Ciaran |
Posted: November 21, 2007 12:08 am
|
 Andre's Mate Group: Members Posts: 1434 Member No.: 222 Joined: August 12, 2005 |
Great advice there Derek. I suspect I will soon be attempting the same, suspect mine is cracked too as I've noticed that I get water from the windscreen washer reservoir exiting under the car when I fill it up beyond a certain height, and recently I'm getting 'FILL WINDSHIELD WASHER' everytime I wash the windscreen....
Ciarán -------------------- '95 XM 2.1TD VSX Hatch: RP 6429. Rare green ;-)
'90 XM 2.0 SEI Hatch: RP 4832 - 'Gandalf the grey' '95 Xantia 1.9TD SX Hatch: RP ????. Black - 'Darth Vader'. Will be MOT'd '95 Xantia 1.9TD SX Hatch: RP ????. Blue - Utterly fooked Location: Outskirts of Belfast in the sunny north of Ireland... |
|
|
| DerekW |
Posted: November 21, 2007 07:16 pm
|
|
Andre's Mate Group: Members Posts: 1320 Member No.: 173 Joined: June 01, 2005 |
Hi Ciaran,
Yes, those were the symptoms that I had. Derek -------------------- 1999 3.0V624v Exclusive Black! (RP8362)
2004 C3 Sensodrive Exclusive 1994 ZX Aura 1.8 auto Location: 5 miles North of Boston, Lincolnshire |
|
|
| jamieb |
Posted: December 06, 2007 12:26 pm
|
|
Advanced Member Group: Members Posts: 132 Member No.: 423 Joined: August 17, 2006 |
I'm v impressed you got it out as I heard this was impossible (or near enough impossible) without removing the wing. Is there a knack to it? (mine's full of gunk and I wd love to clean it).
Jamie -------------------- Jamieb
1998 XM: 2L Turbo Hatch VSX 1988 CX: 2.2 TRS deceased 1992 XM 2.1 Diesel Turbo |
|
|
| techmanagain |
Posted: December 06, 2007 01:13 pm
|
|
Double Chevron Group: Members Posts: 933 Member No.: 273 Joined: November 21, 2005 |
It is not necessary to remove the wing, only the plastic mudshield on the relevant side (and the bolt(s) holding the water container).
The water container for the front and rear screen is on the LH (UKpassenger) side. The plastic mudshield has to be levered out from the edge of the wing or from its retaining lugs in the centreline of the wing, together with the plastic plugs, and one nut at the base, after the wheel has been removed for easy access. The push-in plastic plugs are easily lost but are obtainable from Citroen (in quantity - usually about 5).Part Number 6992C6. -------------------- Xantia 2 litre HDi Saloon X reg 1999
.Peugeot 306 1.8 Petrol Automatic Hatchback. Now for sale. |

|
| rowanmoor |
Posted: December 06, 2007 02:13 pm
|
|
Double Chevron Group: Members Posts: 548 Member No.: 367 Joined: May 08, 2006 |
When I did it I seem to remember that popping the indicator repeater out helped get a bit more space where I needed it. But other than that I managed with the mudshield still attached but just popped out so it was dangling over the hub. It did take a bit of pushing too and fro to work out the right angle etc to get it past things.
-------------------- 94M XM 2.5 TD VSX Estate RP 6430 Forest Green
Redhill, Surrey. |
|
|
| DerekW |
Posted: December 06, 2007 06:47 pm
|
|
Andre's Mate Group: Members Posts: 1320 Member No.: 173 Joined: June 01, 2005 |
I did it the long way, took the wing off.
However if you are adept at doing jigsaw puzzles in the dark you should be aware that there is a bolt at the front lower corner of the tank with a nut on the engine side of the wing; there is an extension at the back of the tank with a rubber sleeve around it that has to be lifted (or pulled forward) out of a metal retaining clip on the inner wing, the filler pipe stops that so you'll need to remove the filler pipe from the engine side; finally you have three electrical connectors and two water pipes that will make things difficult. The wing is relatively easy to take off - I'd say a two spanner job - but you will almost certainly break at least one of the retaining clips on the plastic extension to the scuttle. "No nails" anyone? Either way, good luck. Derek This post has been edited by DerekW on December 06, 2007 06:48 pm -------------------- 1999 3.0V624v Exclusive Black! (RP8362)
2004 C3 Sensodrive Exclusive 1994 ZX Aura 1.8 auto Location: 5 miles North of Boston, Lincolnshire |
|
|
| DerekW |
Posted: December 06, 2007 11:18 pm
|
|
Andre's Mate Group: Members Posts: 1320 Member No.: 173 Joined: June 01, 2005 |
.... and here's a piccy of the reservoir in situ
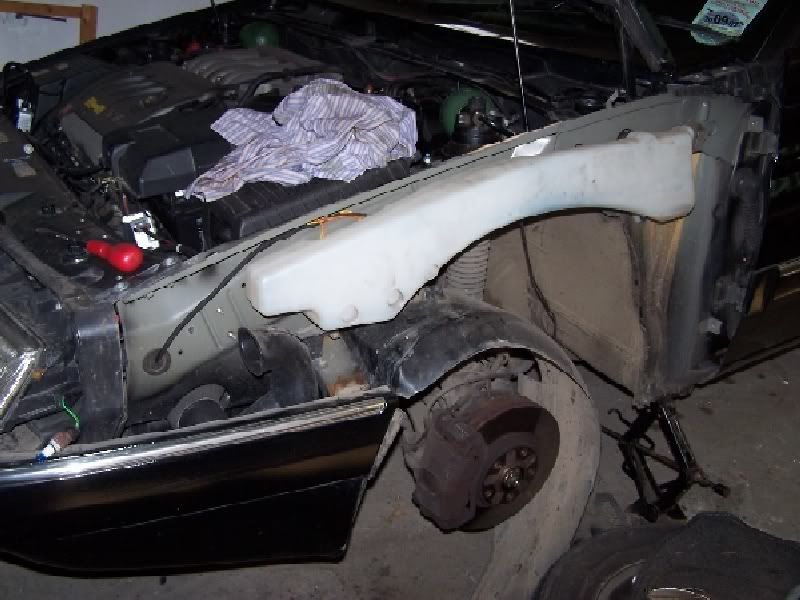 I think there's an extra bolt under the tank towards the rear that I forgot to mention. That isn't rust at the back of the wheel arch - it's some sort of sealant I think. Oh, and the car is supported on a stand. Sorry about the old pyjamas, I get my cleaning rags where I can. Derek -------------------- 1999 3.0V624v Exclusive Black! (RP8362)
2004 C3 Sensodrive Exclusive 1994 ZX Aura 1.8 auto Location: 5 miles North of Boston, Lincolnshire |
|
|
| dean |
Posted: December 07, 2007 11:45 pm
|
 Andre's Mate Group: Members Posts: 1441 Member No.: 852 Joined: May 23, 2007 |
A black V6 exclusive!!!
 , Very VERY nice sir! , Very VERY nice sir!Dean -------------------- 92 xm 20i prestige auto (modified)R.P 5678
96 Xantia Activa (modified) location-Isle of wight |
|
|
| Ciaran |
Posted: December 08, 2007 12:31 am
|
|
Andre's Mate Group: Members Posts: 1434 Member No.: 222 Joined: August 12, 2005 |
That reservoir is even bigger than I imagined, no wonder it takes so long to fill!
 Whats the capacity of it anyway? Ciarán -------------------- '95 XM 2.1TD VSX Hatch: RP 6429. Rare green ;-)
'90 XM 2.0 SEI Hatch: RP 4832 - 'Gandalf the grey' '95 Xantia 1.9TD SX Hatch: RP ????. Black - 'Darth Vader'. Will be MOT'd '95 Xantia 1.9TD SX Hatch: RP ????. Blue - Utterly fooked Location: Outskirts of Belfast in the sunny north of Ireland... |
|
|
| DerekW |
Posted: December 09, 2007 12:36 am
|
|
Andre's Mate Group: Members Posts: 1320 Member No.: 173 Joined: June 01, 2005 |
I usually fill it using one of the missus's glass measuring jugs, I think it (the tank, not the jug) holds about five litres.
Derek -------------------- 1999 3.0V624v Exclusive Black! (RP8362)
2004 C3 Sensodrive Exclusive 1994 ZX Aura 1.8 auto Location: 5 miles North of Boston, Lincolnshire |
|
|
| xmowner |
Posted: December 10, 2007 07:55 pm
|
|
Member Group: Members Posts: 20 Member No.: 60 Joined: May 11, 2004 |
are there 2 seperate pumps on the reservoir , one for the front and one for the rear wash / wipe? My front jets won't work and there dose'nt seem to be any pump noise, but the rear works fine.
|
|
|
| DerekW |
Posted: December 10, 2007 08:13 pm
|
|
Andre's Mate Group: Members Posts: 1320 Member No.: 173 Joined: June 01, 2005 |
Hi xmowner,
Yes, there is a pump each for front and rear. Each of the four holes in the tank has a rubber sealing grommet fitted and the components (two pumps, one "empty" level sensor and the filler pipe) are then pushed into the grommets. They are all on the hidden side in my photo so I don't think you'll get to any of them without removing the tank. DErek -------------------- 1999 3.0V624v Exclusive Black! (RP8362)
2004 C3 Sensodrive Exclusive 1994 ZX Aura 1.8 auto Location: 5 miles North of Boston, Lincolnshire |
|
|
| UFO |
Posted: December 10, 2007 11:12 pm
|
 Super Member Group: Members Posts: 323 Member No.: 319 Joined: February 06, 2006 |
Well....
The time is right - out with the tools and whip that tank off and take some photos. Share the joy Derek!   -------------------- Craig Keller
'09 C5 HDi Exclusive '74 D Special '85 CX 25ie Pallas Previous '96 XM V6 Exclusive '87 BX TRi http://www.citroencarclub.org.au CCC of NSW Inc http://www.citroencarclub.org.au/forum Australian Citroen Forum http://www.aussiefrogs.com Aussiefrogs - Aussies (and others) who drive and love their French cars |

|
| DerekW |
Posted: December 11, 2007 12:51 am
|
|
Andre's Mate Group: Members Posts: 1320 Member No.: 173 Joined: June 01, 2005 |
Sorry Craig, too late. It's all back together now.
But for anyone who's interested, the picture shows three bulges low down towards the front. They mark the positions of the three electrical items. The two lower forward ones are the two pumps, sorry I can't remember which is which, the higher rearward bulge is the level switch. This is simply two prongs across which the circuit is completed by the water. The electrical plugs are the usual type with a spring wire locking device. The two water pipes run rearwards from the pumps. At the rear, the swelling at the top is where the filler pipe fits and behind that is the extension with the rubber sleeve that locates and secures the top of the tank. It was only when I'd put the tank back on that I remembered XMexclusive's comment to me about photographing everything for future reference; I didn't even think about photo'ing the hidden side, sorry. Derek PS The parts schedule may show which pump is which, I'll check tomorrow and post the info if it's there. -------------------- 1999 3.0V624v Exclusive Black! (RP8362)
2004 C3 Sensodrive Exclusive 1994 ZX Aura 1.8 auto Location: 5 miles North of Boston, Lincolnshire |
|
|
1 User(s) are reading this topic (1 Guests and 0 Anonymous Users)
0 Members:
 2 Pages:12 2 Pages:12 |
|
Skin arobase par alphega @ PCentraide 2005 (original)
V1.3 par Elianora la blanche @ La Caverne de la Rose pourpre
V1.3 par Elianora la blanche @ La Caverne de la Rose pourpre
Powered by Invision Power Board(U) v1.3.1 Final © 2003 IPS, Inc.