| Welcome Guest ( Log In | Register ) | Resend Validation Email |

| 2 Pages:12 ( Go to first unread post ) |    |
| DerekW |
Posted: June 24, 2007 03:59 pm
|
|
Andre's Mate  Group: Members Posts: 1320 Member No.: 173 Joined: June 01, 2005 |
Update on the estate.
Instrument panel is now out for me to restore the light behind the gear indicator. Waiting for delivery from China of a set of tiny tork drivers so I can get into the tacho. The lower panel is resisting all my attempts to remove it - I'm going to break something soon. This is coming out I hope so I can (a) restore some of the missing lines on the L.H. matrix and (  ) change the bulb behind the computer readout. ) change the bulb behind the computer readout. Trying to depress the supposed tangs on the dot matrix display has produced only frustration; did I read somewhere that some of them are held in place by screws? I've purloined a small make up mirror from the wife's handbag hoping to be able to see what's going on but it's difficult to maneover a mirror, a torch and a screwdriver at the same time. Why didn't the Great Ju-Ju provide us with three hands? At least I am, as they used to say in "Listen with Mother", sitting comfortably - it beats lying on your back with your eyes full of dirt. I'm sure I'm missing something on this panel removal but I'm still suffering from the "help files gobbledegook" download syndrome. Cleaning the inside of the car I found 75p and a pair of ladies small socks. So the car only cost me £249.25p! Ah well, back to the fight. Derek -------------------- 1999 3.0V624v Exclusive Black! (RP8362)
2004 C3 Sensodrive Exclusive 1994 ZX Aura 1.8 auto Location: 5 miles North of Boston, Lincolnshire |
 

|


| techmanagain |
Posted: June 24, 2007 04:55 pm
|
|
Double Chevron Group: Members Posts: 933 Member No.: 273 Joined: November 21, 2005 |
Citroen have a habit of hiding the screws under either blanking plugs on the dashboard or even under the red flashing warning light.
-------------------- Xantia 2 litre HDi Saloon X reg 1999
.Peugeot 306 1.8 Petrol Automatic Hatchback. Now for sale. |

|
| DerekW |
Posted: June 24, 2007 06:41 pm
|
|
Andre's Mate Group: Members Posts: 1320 Member No.: 173 Joined: June 01, 2005 |
Thanks Techmanagain, been there, done that!
My good friend (hope he's not offended by that) XMexclusive has suggested that its a strong spring clip on the right hand side of the dash that's the problem. At present the car is tail end up on ramps for a rear silencer change. Once it's down to a more normal attitude I'll lunch on spinach and then it's "Have at you, varlet". Derek -------------------- 1999 3.0V624v Exclusive Black! (RP8362)
2004 C3 Sensodrive Exclusive 1994 ZX Aura 1.8 auto Location: 5 miles North of Boston, Lincolnshire |
|
|
| colinxm |
Posted: June 24, 2007 07:50 pm
|
 Super Member Group: Members Posts: 415 Member No.: 100 Joined: December 02, 2004 |
Hi Derek, have a look from in front of the car through the windscreen at close quarters, you should be able to see the two offending screws low down, by where the multiplugs for the display are to be found (if I remember correctly)
Good luck, Colin.P -------------------- Colin.P.
Jørpeland, Norway 1995 2.1TD silver estate, Rp 6723 1979 Triumph TR7 convertable 1998 Ford Puma (the wife's) 1989 Peugeot 205 cabriolet (the son's but I have to fix it...) 2004 Peugeot 307SW (another one for the missus) |
|
|
| DerekW |
Posted: June 24, 2007 09:36 pm
|
|
Andre's Mate Group: Members Posts: 1320 Member No.: 173 Joined: June 01, 2005 |
Thanks Colin, all will I hope become clear tomorrow.
Derek -------------------- 1999 3.0V624v Exclusive Black! (RP8362)
2004 C3 Sensodrive Exclusive 1994 ZX Aura 1.8 auto Location: 5 miles North of Boston, Lincolnshire |
|
|
| wirdy |
Posted: June 25, 2007 12:20 am
|
 Double Chevron Group: Members Posts: 561 Member No.: 411 Joined: July 26, 2006 |
Derek - I got my LH matrix out of my S2 without removing the lower panel - it does need a small crosspoint screwdriver (like those watchmakers ones) to get inthere by feel only.
I found the most difficult bit to be reconnecting the ribbon cables - they're easy to spring off under tension but there ain't room for your fingers on the way back in! A sunny day and no distractions help  .....I wish... .....I wish... -------------------- '99 'V' XM 2.0 CT VSX Auto Estate RP 8360 Green.
'97 'R' XM 2.0 CT VSX Auto Saloon RP 7480 Blue. '96 'P' XM 2.0 16v Man Saloon RP 7176 Magenta. Fife, Scotland. |
|
|
| DerekW |
Posted: July 02, 2007 11:16 am
|
|
Andre's Mate Group: Members Posts: 1320 Member No.: 173 Joined: June 01, 2005 |
Well that was interesting.
I've been popping out every now and then between my other jobs and having a go at the panel, no success other than that my invention of new swear words has gone up exponentially. The panel seems to be fouling against the upper housing on the steering wheel, with a bit of help from the area around the heater control panel. I really don't want to take the wheel housing off. Yesterday afternoon I decided to undo all the visible screws to see if I could lift the displays out without removing the panel. Using my stubby ratchet screwdriver I got them all out except one and there just wasn't enough room to get a straight attack on it. Thinks, "if I unlock the steering wheel and pull it back towards me from its normal fully forward position, I should be able to get to that screw." Yes, and with all that extra room I was able to remove the panel with ease. - Stupid, stupid, stupid. Go on, have a good laugh, how did I miss something so obvious? Next trick, taking the dot matrix apart; that should be fun. This saga is beginning to sound like "The Diary of a Nobody"; delete "bo" insert "d". Derek This post has been edited by DerekW on July 02, 2007 12:19 pm -------------------- 1999 3.0V624v Exclusive Black! (RP8362)
2004 C3 Sensodrive Exclusive 1994 ZX Aura 1.8 auto Location: 5 miles North of Boston, Lincolnshire |
|
|
| Jan-hendrik |
Posted: July 03, 2007 08:11 am
|
 Double Chevron Group: Members Posts: 569 Member No.: 716 Joined: March 28, 2007 |
It is all much, much simpler than you think.
Getting access to the unit doesn't take longer than 10 minutes, and removing it from its bracket another 2 :-) (That is, once you know how to do it, and the info provided here will make sure you do !!) Sorry, useless links deleted! This post has been edited by Jan-hendrik on July 04, 2007 01:06 am -------------------- 2000 XM 3.0 V6 24v Exclusive Auto 70k km (LHD; ORGA 8569)
Green (the colour that is) Location: Hiroshima City, Japan |
|
|
| DerekW |
Posted: July 03, 2007 08:38 pm
|
|
Andre's Mate Group: Members Posts: 1320 Member No.: 173 Joined: June 01, 2005 |
Hi Jan-hendrik,
Unfortunately, the three links that you provided all give the same message "The link could not be saved, the link might have been moved or had its name changed". Left clicking on the "download file" gives "error detected, code 115". I suspect that these links are the ones I already have, the French one is of little use to me; the translated version is rather like a Times crossword - Quote 1 "Currently repair amounts remaking contact on the remainder of the tracks forcing abimees by takeoff and/or the intial residual zone not stuck. The idea to gain some tenth is not good...." Quote 2 "The method of joining was interressante in measurement or the zone of contact is protegee external aggressions (air, moisture.) Moreover takeoff is not without risk in the degradation of the conducting layers of the tablecloth... How is made the contact in the beginning: a film is serigraphy with conducting tracks with ink containing money (gray clearly)." I could go on but I hope I've made my point. I agree with you that getting the components out is easy when you know how, it's difficult when you're feeling your way and are afraid of breaking something because you can't see how it's held in place. Ten minutes? I don't think so. It's obvious that the loss of columns and lines is caused by poor connections between the circuit board and the ribbon cable and/or the ribbon cable and the display. I now have the display unravelled and have examined the join between the circuit board and the ribbon cable with a strong magnifying lens. I can see no evidence of disupted tracks. The join between the ribbon cable and the display screen is internal and will require dismantling of the screen and if I understand the translation this involves the use of acetone to dissolve the adhesive layer between the two glass screens, and that this will, in turn, attack the circuits. Mention is made of cleaning the connections with alcohol. Do you think methylated spirits will do? I've painted a piece of white paper with meths and when dries it leaves virtually no colour residue. Derek -------------------- 1999 3.0V624v Exclusive Black! (RP8362)
2004 C3 Sensodrive Exclusive 1994 ZX Aura 1.8 auto Location: 5 miles North of Boston, Lincolnshire |
|
|
| DerekW |
Posted: July 03, 2007 10:23 pm
|
|
Andre's Mate Group: Members Posts: 1320 Member No.: 173 Joined: June 01, 2005 |
This shows the L.H.display unwrapped. The screen is face down under the white housing at the bottom of the picture.
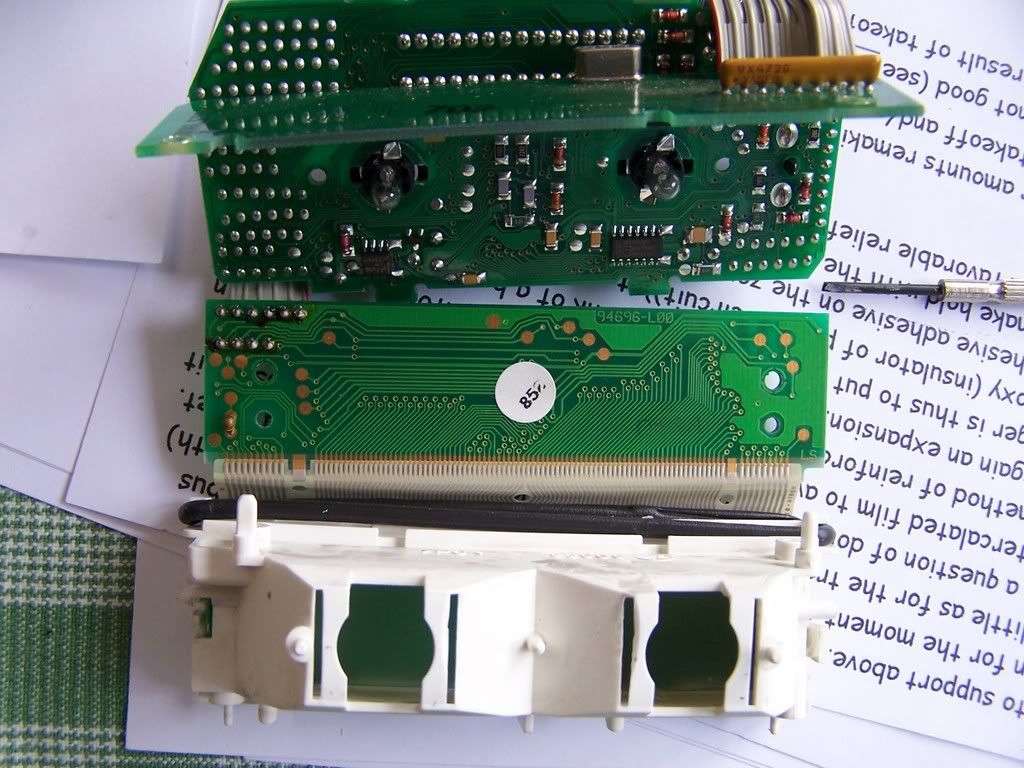 There are 85 narrow tracks in the centre, with a further nine wider tracks each side. I've produced a large photo so you can see if there are any broken tracks visible. Am I correct in assuming that the 85 narrow tracks carry the pixel column addresses and the 18 wider tracks carry the line addresses? If so, I should be able to locate the dodgy tracks by counting the positions of the missing lines and columns. N'est pas? Where am I supposed to add the pencil lines to restore the tracks? Derek -------------------- 1999 3.0V624v Exclusive Black! (RP8362)
2004 C3 Sensodrive Exclusive 1994 ZX Aura 1.8 auto Location: 5 miles North of Boston, Lincolnshire |
|
|
| Jan-hendrik |
Posted: July 04, 2007 01:18 am
|
|
Double Chevron Group: Members Posts: 569 Member No.: 716 Joined: March 28, 2007 |
Sorry, Derek. The bl.... links did not work after posting. For now here is the English translation done by myself and not by some silly software.
Dot Matrix repair procedure You will need: Replacement rubber-like connector Torx screwdrivers Box cutter Solvent 2 hours of your time Gaining access to the dot matrix module is the same for all XM cars. You need to remove the complete display housing above the steering column and remove all screws that hold the lower fascia in place. The photos give clear indications as to which torx screws to remove. Remove the negative battery terminal before dismantling the instrument panel. The screws located on either side of the steering column are behind little covers that can be pried off carefully with a narrow flat blade, like a box cutter. Pull the steering column towards you and tilt it down to get to them. I did not follow the same procedure as indicated in photo/page 5. With a small flat blade screwdriver I pried out only the blind button on the far right. Behind it is a screw. Another one is shown on page 6. You need to prize off the cover. Page 10 shows how you can get good access to the matrix module. Unclip the wiring connector. Next you have to remove the black housing cover of the module. This page now confronts you with two different modules. On my XM there was no way you could get it out without removing the black cover. Have a close look and with a small screwdriver unclip it. Next you will see you can lift the upper horizontal PCB and conversely lower the bottom horizontal PCB by pressing slightly to unlock the complete unit so you can slide it out. (Sorry, no pictures!) Remove the tiny screws that hold the PCB with the 80-contact connector. Fold it down and remove the flexible connector. You won’t need it anymore so don’t worry if you damage it. It might still look pretty good to you, but don’t get fooled by looks. The glass is held in place with two small plastic hooks on the sides. Carefully bend them and take off the glass. Before fitting the new connector it is absolutely imperative that all traces of glue are removed from the contacts and the glass. I could not get the stuff off with solvent (white spirit) so I used a sharp blade to carefully scrape it off and afterward wiped away all possible traces with white spirit. You may have to use a magnifying glass to make sure everything is spotless. If any traces of dirt are left behind, the display will still have missing pixels. OK, now everything is perfectly clean. Locate the connector as seen on page 13. Don’t let it overlap the contacts too much. Screw down the PCB. Next locate the other end of the connector behind the glass in the step provided for it. Clip the glass in place. If the glass feels loose, meaning that the plastic clips do not provide sufficient grip, you can cut out an extra mask of paper to add an extra cushion, or insert a 0.5 mm insulated wire. Refitting the display is a reversal of the removal procedure. Have fun! Jan Burgel Hiroshima, Japan Don't be deceived by the look of the connector. Remove it and replace it with the rubber thingy. Have you already got one? If not, get it from eclipse on Ebay. I have not tried the 'pencil method', so can not say anything definite about it. But this is what the author wrote: QUOTE Unfold the internal parts: two connected printed circuit boards and a flexible cable going to the display—the latter the actual culprit. The connection breaks over time as both the printed tracks and the rubber pad pushing the flexible cable to the board deteriorate. Remove the two small screws and carefully remove the flexible cable. Dabbing it with pure alcohol might help preserve more of the tracks. Repair all the tracks with a 0.5 mm pencil: simply draw the outlines first then fill them. Make sure you don't create erroneous connections between adjacent tracks. Blow on it to remove the superfluous graphite powder. Clean the area on the printed circuit board where the cable connects to with pure alcohol. To restore the necessary pressure of the rubber pad, turn it over. Remove the display from the plastic housing: remove the small metal covering first by bending its lugs carefully, then the display itself. Turn the rubber and reassemble the display unit. Finally, refit the display unit into the housing, reconnecting the various plugs. Before you replace all the screws of the housing, check the satisfactory operation of the dot matrix display. UNQUOTE This quote copied from the following site: http://www.tramontana.co.hu/citroen/electr...ric.php#Display This post has been edited by Jan-hendrik on September 08, 2012 09:23 am -------------------- 2000 XM 3.0 V6 24v Exclusive Auto 70k km (LHD; ORGA 8569)
Green (the colour that is) Location: Hiroshima City, Japan |
|
|
| techmanagain |
Posted: July 04, 2007 11:43 am
|
|
Double Chevron Group: Members Posts: 933 Member No.: 273 Joined: November 21, 2005 |
Mention is made of cleaning the connections with alcohol. Do you think methylated spirits will do? I've painted a piece of white paper with meths and when dries it leaves virtually no colour residue.<<<<<<<
Methylated Spirit is alcohol plus something to make it foul to drink. Use it, but don't drink it! The problem is in the fact that the pressure between the wire contacts and the glass screen has failed. With a "thinnish" extra backing to help increase the pressure you may be able to remake the contacts, but clean the old ones with meths first. The connector available on ebay and mentioned elsewhere on this thread may do this job for you. -------------------- Xantia 2 litre HDi Saloon X reg 1999
.Peugeot 306 1.8 Petrol Automatic Hatchback. Now for sale. |
|
|
| Jan-hendrik |
Posted: July 04, 2007 01:08 pm
|
|
Double Chevron Group: Members Posts: 569 Member No.: 716 Joined: March 28, 2007 |
Your Spirit (no pun intended) may do the trick. But I would not recommend re-using the original connector as it is bound to fail again.
-------------------- 2000 XM 3.0 V6 24v Exclusive Auto 70k km (LHD; ORGA 8569)
Green (the colour that is) Location: Hiroshima City, Japan |
|
|
| DerekW |
Posted: July 04, 2007 04:25 pm
|
|
Andre's Mate Group: Members Posts: 1320 Member No.: 173 Joined: June 01, 2005 |
Many thanks Jan, for your excellent translation and advice. I wish I was multi-lingual but unfortunately it's not one of my (few) skills.
Thanks to you too, techmanagain. Derek -------------------- 1999 3.0V624v Exclusive Black! (RP8362)
2004 C3 Sensodrive Exclusive 1994 ZX Aura 1.8 auto Location: 5 miles North of Boston, Lincolnshire |
|
|
| DerekW |
Posted: July 10, 2007 08:03 pm
|
|
Andre's Mate Group: Members Posts: 1320 Member No.: 173 Joined: June 01, 2005 |
Right, I've peeled off the multi track connector from the screen and the circuit board. I've carefully scraped the adhesive off the gold plated connectors on the screen and circuit board. I've cleaned the edge connectors on the flexi connector with meths and am happy to fill in all the tracks with an HB pencil. But........
Nowhere can I see what adhesive to use in reassembly. It seems to be an impossible specification, it must be conductive to restore the contacts whilst being resistive so that it doesn't transfer signals between tracks. Any ideas? Derek -------------------- 1999 3.0V624v Exclusive Black! (RP8362)
2004 C3 Sensodrive Exclusive 1994 ZX Aura 1.8 auto Location: 5 miles North of Boston, Lincolnshire |
|
|
1 User(s) are reading this topic (1 Guests and 0 Anonymous Users)
0 Members:
 2 Pages:12 2 Pages:12 |
|
Skin arobase par alphega @ PCentraide 2005 (original)
V1.3 par Elianora la blanche @ La Caverne de la Rose pourpre
V1.3 par Elianora la blanche @ La Caverne de la Rose pourpre
Powered by Invision Power Board(U) v1.3.1 Final © 2003 IPS, Inc.